Front end Customer Panel
The Front-End Customer panel allows your customers to manage their appointments or make changes to them. With the front-end customer panel, your customers can create profiles on mysched.co and update their information.
Important: The customer panel is not designed for booking appointments. You must configure the booking widget so that customers can book appointments without logging in to mysched.
How to Configure the Customer Panel
Navigate to Settings -> Front-end panels -> Customer Panel. In this section, you can grant your customers various permissions, such as:
- Allow customers to reschedule their appointments.
- Allow customers to cancel their appointments.
- Allow customers to delete their accounts.
Important Notice
If you want to restrict bookings to only registered users, go to Settings -> General Settings and enable "Only registered users can book." For this to work properly:
- Add customers manually in the Customers section.
- Import customers via the import option.
- Instruct your customers to register via this link: Customer Signup.
If you do not enable this option, customers will receive a confirmation link to complete their registration and access the customer panel for appointment management. You can assist customers in changing their passwords and allowing them to log in by editing their profiles.
Creating a Customer Profile When a New Booking is Made
When a new booking is made, a customer profile is automatically created. You can set up a workflow to send notifications for new customer accounts.
Workflow for New Customer Notifications
- Create a workflow and select the New customer created event.
- Choose the desired notification action.
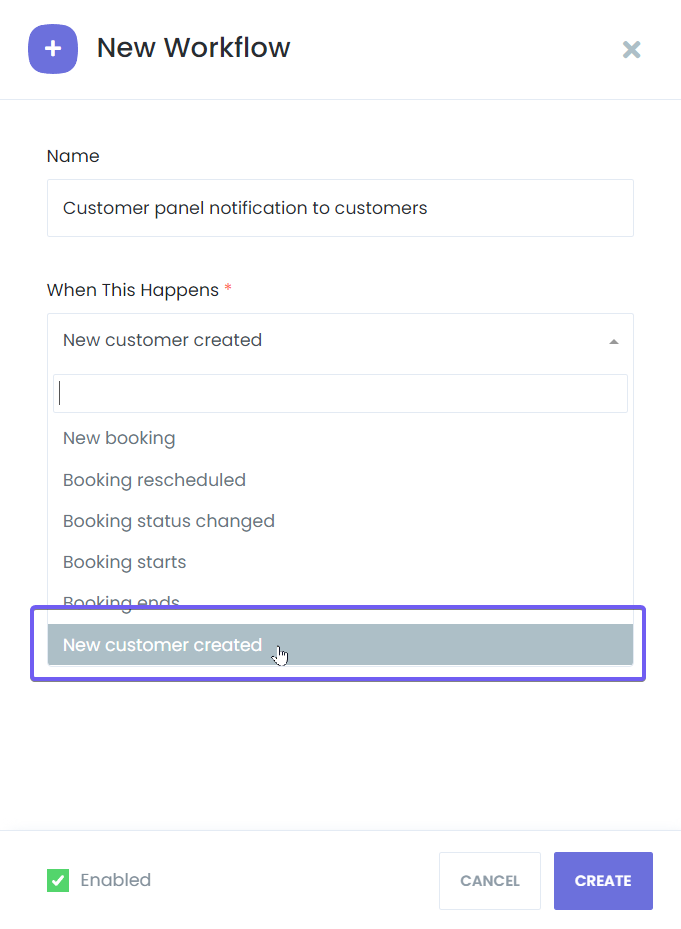
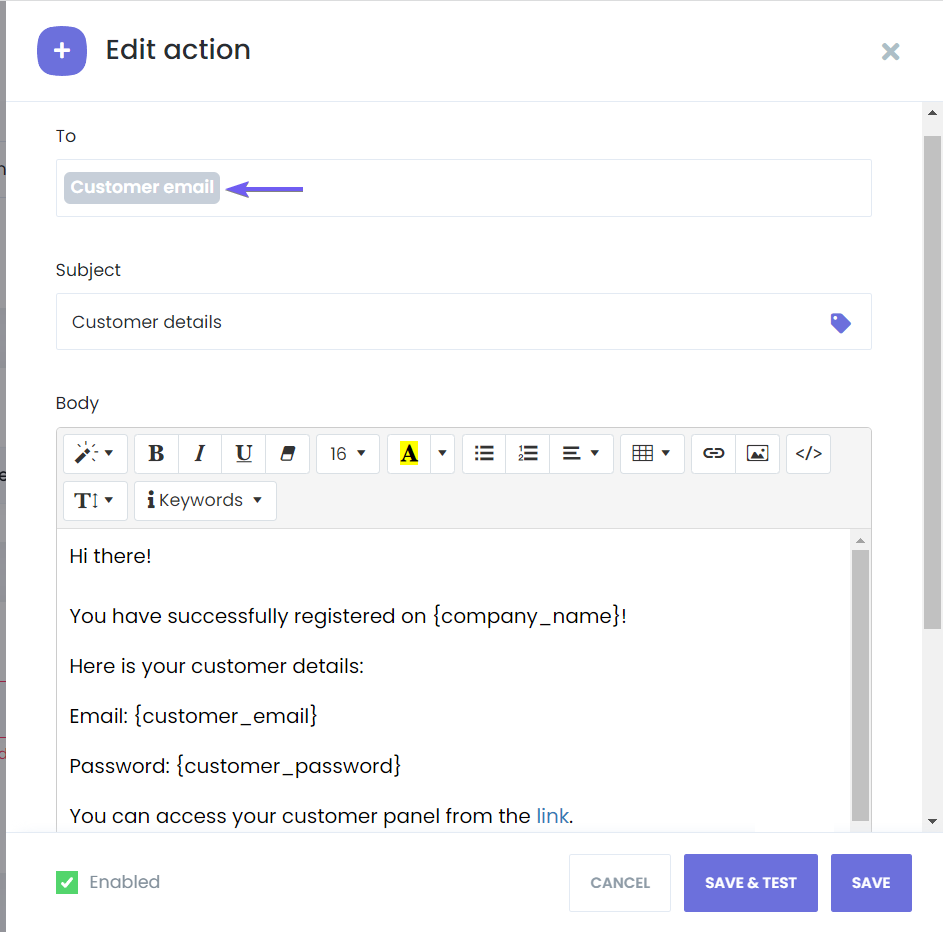
In the notification template, add the appropriate keywords, select "Customer" for the "To" field, and save the workflow.
When an unregistered customer makes an appointment, a random password will be generated and sent to the customer via notifications. Customers can then access the customer panel to manage their appointments and change their passwords.
Note: The email address field must be required for the correct configuration of the Front-end Customer Panel, as it serves as the username for customer accounts.
Creating a Customer Profile Without Making an Appointment
If you prefer to allow registration without an appointment, use the convenient "Sign-up" page. Follow these steps:
- Go to the admin panel and create a new workflow for the Customer created event.
- This workflow will be triggered when you manually add a customer or when a customer completes the sign-up process.
- Include the
{customer_password}shortcode in the email template to send the manually created password.
After saving the workflow, you can test the customer creation process by visiting the customer login page and signing in with the provided credentials.
For further instructions, visit the workflows documentation page.
Booking Steps
You can customize or deactivate the steps in the front-end panels through the settings tab:
- Location: Hide location selection or hide the address of the location.
- Staff: Deactivate staff selection or choose footer text options per staff, such as:
- Show both phone number and email address
- Show only Staff email address
- Show only Staff phone number
- Don't show both phone number and email address
- Enable the "Any staff" option and set auto-assignment rules (e.g., least assigned by the day, most assigned by the month, etc.)
- Service: Deactivate this step or collapse services under a category.
- Service Extras: Deactivate this step or configure options like:
- Skip this step if a service has no extras.
- Collapse service extras under a category.
- Show all service extras.
Date & Time
The Date & Time step is mandatory, but you can configure the following options:
- Time format for the booking form: Choose between showing both start and end time or only the start time.
- Start the booking calendar from: Select either the current month or a specific month.
- Hide the number of available slots: Toggle this option to control the visibility of available slots.
Information
In the Information tab, you can configure the following:
- Identify customers by email or phone number.
- Set email and phone number fields as required or optional.
- Separate first and last name inputs.
- Set a default phone country code, which customers can change during booking.
Cart
You can activate or deactivate the cart tab.
Confirmation
In the Confirmation tab, you can configure:
- Hide payment methods section.
- Do not show the discount row if a discount is not added.
- Hide the price section.
- Redirect users on confirmation (requires a URL).
- Hide the coupon section.
Finish
In the Finish tab, configure the following:
- URL of the "FINISH BOOKING" button: Add a redirection URL for the finish booking button. By default, this option reloads the current page.
- Hide the "ADD TO GOOGLE CALENDAR" button: Toggle this option on or off.
- Hide the "ADD TO iCAL CALENDAR" button: Toggle this option on or off.
- Hide the "START NEW BOOKING" button: Toggle this option on or off.
- Hide a confirmation number: Toggle this option on or off.
Labels
From the Labels tab, you can dynamically translate your panel. Simply select a language to translate, set a default language, and edit the text directly in your visual builder.
Customer Panel Tab
In the Customer Panel tab, you can make the following changes:
- Time restriction to change appointments: By default, this is set to 5 minutes (5m). You can adjust this setting and configure restrictions such as:
- Allow customers to change appointment status.
- Specify which appointment statuses customers can change.
- Allow customers to reschedule their appointments: Specify the appointment statuses that can be rescheduled.
- Hide the "Pay Now" button on the customer panel: Enable this option if you don't need this feature.
Rating Form
Provide your customers with a rating form via workflows. You can send rating forms to customers after their appointments to rate your staff. This is useful for managing staff performance or selecting an employee of the month. You can also set a link expiration period or disable link expiration.
Activate or deactivate the following options:
- Show the Staff rating in the booking form.
- Show the Service rating in the booking form.
- Show description field.
- Show the Rating button after the appointment is finished in the Customer Panel.
- Customize the "Description Label" text for your rating form.
Donation
With the Donation feature, your customers can make donations if you are a charity, aid center, or nonprofit organization. This feature can also be configured as a tipping option for your business. Configure these settings in Front-end panels -> Donation.
General Tab
In the General tab, you can change the default “Donate me” button, set a finish URL after your customers donate, and select a payment method.
Suggested Amounts Tab
Set suggested amounts for donations. Experience shows that suggested amounts can increase donation rates.
Purposes Tab
Define purposes for your customers to select from when donating. Enable the "Add 'Other' option" to allow customers to enter custom purposes. If you want to provide a text area for custom purposes, turn on this option. You can hide the purpose selector by deleting all predefined purposes.
Agreement Tab
In the Agreement tab, create a text for your donation agreement. You may need to make this field mandatory, as mysched recommends keeping local legal rules in mind and consulting with a legal advisor. Please provide a specific agreement text, as mysched cannot be held liable for the purpose of your donations and tips; your actions are legally binding solely on you and your company.