General Settings
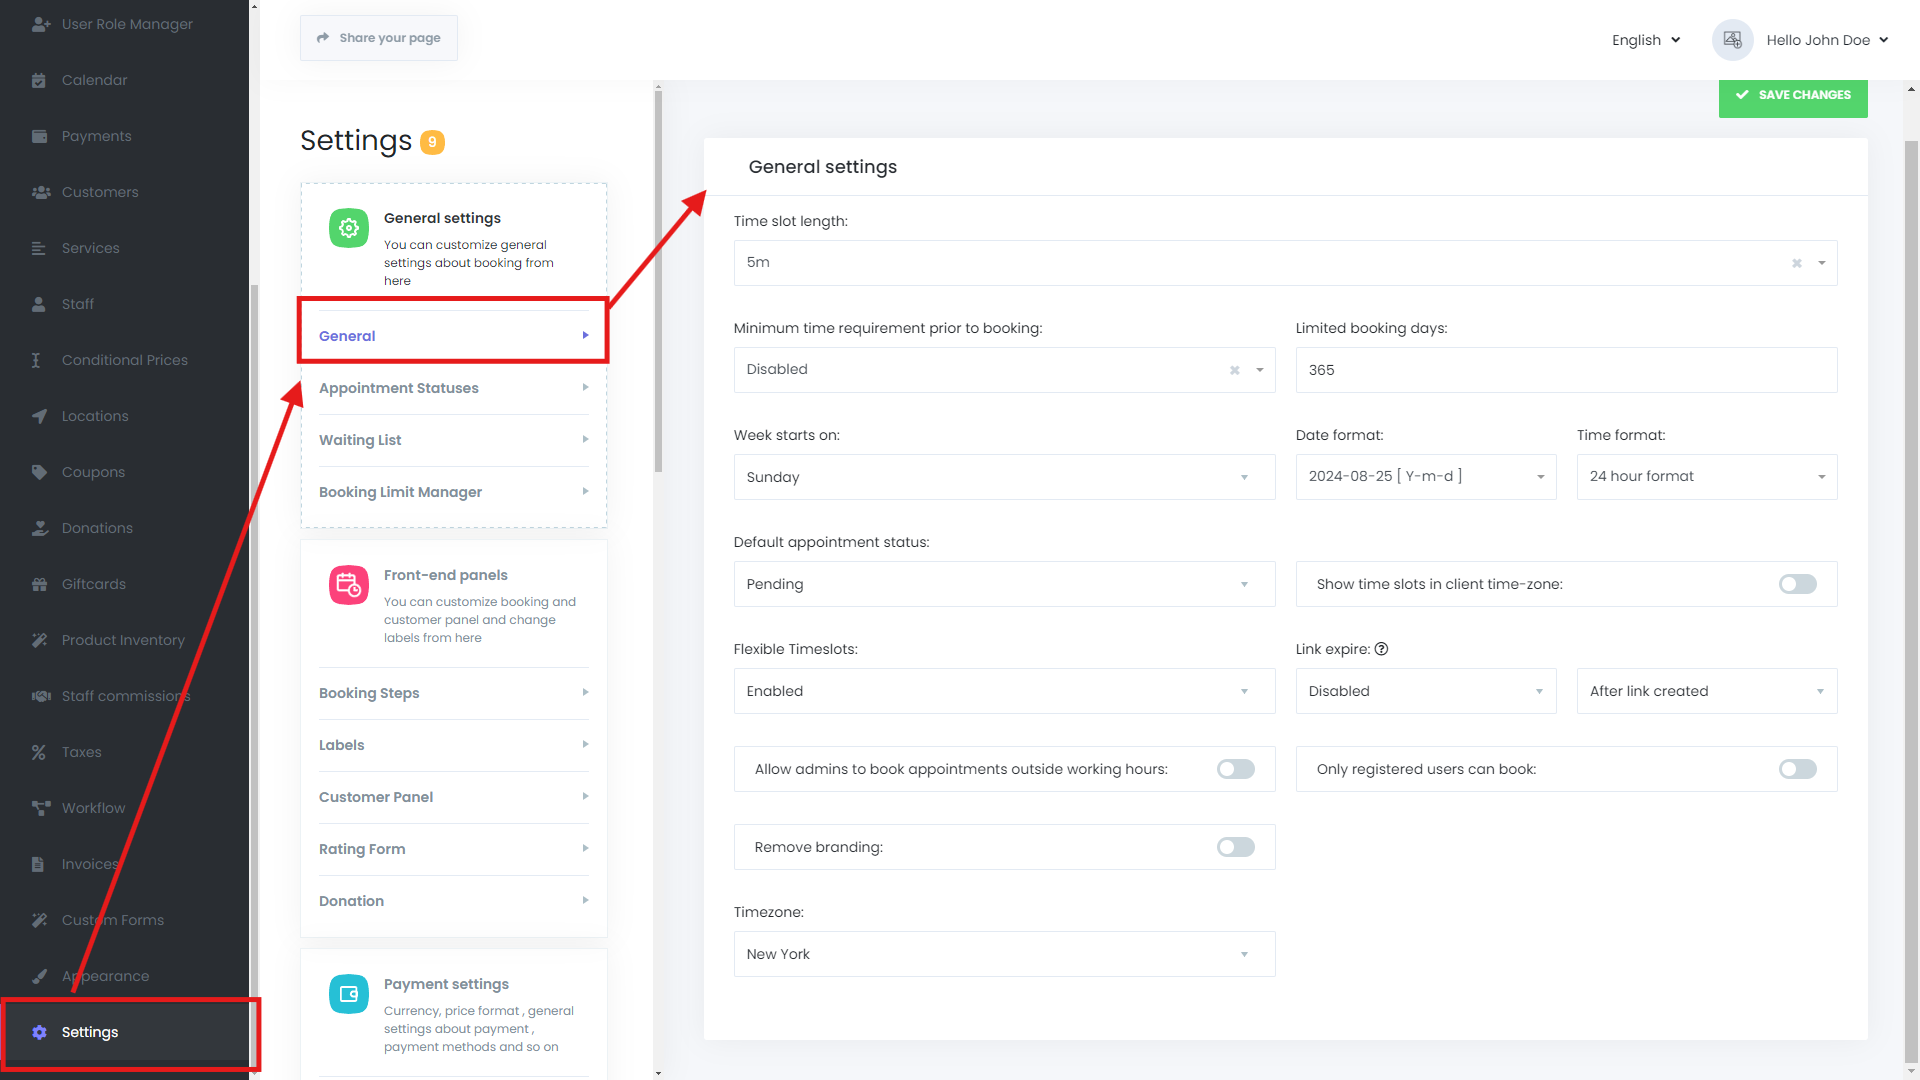
When you navigate to Settings -> General Settings -> General, you will find a wide range of configurable options that help you tailor the Mysched system to your business needs. Below is a detailed overview of each setting available in this tab:
Time Slot Length
This option allows you to set the default duration for each time slot. For example, if you select a time slot length of 30 minutes, your customers will see available appointment times in 30-minute increments, such as 10:30 am, 11:00 am, 11:30 am, and so on. This value acts as the default when setting up services or selecting individual time slots.
- Default value: 5 minutes
Minimum Time Requirement Prior to Booking
By default, this setting is disabled. However, you can set a minimum time requirement before a booking can be made, ranging from 1 minute to 30 days. This feature helps prevent last-minute bookings that might catch you unprepared.
Limited Booking Days
This setting defines the maximum number of days in the future that your customers can book services. The default is set to 365 days, meaning customers can schedule appointments up to one year in advance.
Week Starts On
Since Mysched is used globally, the starting day of the week can differ depending on the region. While the default setting is Sunday, you can change it to Monday or another day that aligns with your local business practices.
Date Format
You can customize how dates are displayed by choosing from the following formats:
Y-m-dm/d/Yd-m-Yd/m/Yd.m.Y
Time Format
Set the time format for your appointments, choosing between the 24-hour format and the 12-hour format.
Default Appointment Status
Select the default status for new appointments. Options include:
- Pending
- Approved
- Rejected
- Canceled
You can also select from any custom statuses you've created under the Appointment Statuses tab.
Show Time Slots in Client Time-Zone
When this option is enabled, time slots will be displayed according to your client’s local time zone, providing a more seamless booking experience.
Flexible Time Slots
If you offer services of varying durations, the Flexible Time Slots feature allows you to maximize your schedule. For instance, if a 10-minute service is booked at 10:30 am, the next available slot will start at 10:40 am rather than waiting until the next full hour, optimizing your time and resources.
Link Expire
This setting relates to the Change Appointment Status via Link feature. You can configure the link to expire under two conditions:
- After Link Created: The link will expire after a specific period once generated.
- Before Appointment Date: The link remains active until a designated time before the appointment.
Choose the option that best suits your operational needs.
Allow Admins to Book Appointments Outside Working Hours
Enable this option to allow admins to manually book appointments even outside of regular working hours.
Only Registered Users Can Book
When this option is enabled, only users registered on mysched.co can book appointments, adding an extra layer of control over who can access your services.
Remove Branding
This option removes the "Powered by mysched.co" branding from your booking interface, providing a more personalized experience for your clients.
Timezone
Ensure that your company’s time zone is set correctly to avoid scheduling issues.
By configuring these settings, you can fine-tune the Mysched platform to work precisely how you need it, ensuring a smooth and efficient appointment booking experience for both your staff and customers.
Appointment Statuses
Mysched offers a highly customizable system for managing appointment statuses, allowing you to tailor the platform to fit the specific needs of your business. The Appointment Statuses feature is essential for maintaining clear and effective communication with your customers and staff, ensuring that everyone is on the same page regarding the status of appointments.
Managing Appointment Statuses
Within this tab, you have the flexibility to add new appointment statuses, as well as edit or delete the default ones. The system comes pre-configured with four essential appointment statuses: Pending, Approved, Canceled, and Rejected. These default statuses cover the basic needs of most businesses, but depending on your operational requirements, you might need to create additional statuses or modify existing ones.
Adding and Editing Appointment Statuses
When creating a new appointment status or editing an existing one, there are several key elements you need to configure:
-
Title: The title is the name of the appointment status that will be visible to both your staff and customers. It’s important to choose a clear and concise title that accurately reflects the status it represents. For example, titles like "Confirmed," "In Progress," or "Completed" might be relevant depending on your business model.
-
Icon Selection: Icons are a visual cue that can help users quickly identify the status of an appointment. Mysched allows you to select an icon for each appointment status from the extensive library available on Font Awesome. You can browse and choose an icon that best represents the status by visiting Font Awesome. The chosen icon will appear alongside the status title in your appointment lists, providing a more intuitive user experience.
-
Color Hex Code: To further enhance visual recognition, you can assign a specific color to each appointment status. This is done by specifying a color hex code, which allows you to customize the look and feel of the status indicators. For instance, you might use green for "Approved," yellow for "Pending," and red for "Canceled." This color-coding system helps users quickly differentiate between statuses at a glance.
-
Key Assignment: Each appointment status must have a unique key, which is essentially an identifier used within the system. These keys are critical for creating workflows and automating actions based on the appointment status. For example, a "Pending" status might have the key
pending, while an "Approved" status could have the keyapproved. These keys allow you to reference the statuses when building workflows, sending notifications, or generating links for changing statuses.
Using Appointment Statuses in Workflows
Once you have set up your appointment statuses with appropriate titles, icons, colors, and keys, you can leverage them in your workflows. Workflows are powerful tools in Mysched that automate various tasks based on specific triggers. For instance, you can create a workflow that sends a notification to a customer when their appointment status changes from "Pending" to "Approved." Similarly, you can generate links that allow customers or staff to update the appointment status directly.
Practical Example
Imagine you run a spa that offers various treatments. You could set up a workflow that changes the appointment status to "In Progress" when a customer checks in and then automatically changes it to "Completed" when the service is finished. Each of these statuses can be visually distinct, with icons and colors that match the nature of the status, ensuring both your staff and customers understand the current state of the appointment.
Conclusion
The Appointment Statuses feature in Mysched is a versatile tool that allows you to fully customize how appointments are managed and tracked within your business. By creating clear and visually distinct statuses, you can enhance communication, reduce errors, and streamline your operations. Whether you’re using the default statuses or creating your own, this feature is designed to adapt to your business needs, making appointment management as smooth and efficient as possible.
Waiting List Feature
The Waiting List feature in Mysched offers a powerful way to manage customer demand when appointment slots are fully booked. This feature allows you to enable or disable a waiting list, which can significantly improve customer satisfaction and optimize your scheduling process.
How Does the Waiting List Work?
When the Waiting List feature is enabled, customers who attempt to book an appointment for a time slot that is already full will be given the option to join the waiting list. If a booked appointment is later canceled, you can easily approve a customer from the waiting list to fill the open slot. This ensures that no appointment time goes unused and that you maximize your booking potential.
Important Configuration Requirements
To ensure the Waiting List feature works correctly, the following conditions must be met:
-
Location Step: The Location step must be visible or pre-selected and ordered before the Date & Time step. This is important because the system needs to know the specific location associated with the appointment before it can place the customer on the waiting list.
-
Service Step: The Service step must also be visible or pre-selected and ordered before the Date & Time step. This ensures that the system knows what service the customer is interested in before placing them on the waiting list.
-
Staff Step: The Staff step must be visible or pre-selected and ordered before the Date & Time step. This allows the system to know which staff member is associated with the appointment.
-
AnyStaff Option: The "AnyStaff" option must be disabled. This prevents the system from assigning customers to random staff members and ensures that the waiting list operates based on specific staff availability.
If these conditions are not met, the Waiting List will not function properly. It's crucial to ensure your booking flow is configured according to these requirements for the waiting list to be effective.
Practical Example
Let’s say you run a busy clinic, and all appointment slots for a particular day are fully booked. A customer who attempts to book an appointment on that day can opt to join the waiting list. If another customer cancels their appointment, you can then review your waiting list and approve the next customer in line to fill the now-available slot. This process keeps your schedule full and ensures that no time is wasted.
By enabling the Waiting List feature, you provide a flexible solution for managing high demand and last-minute cancellations, ultimately leading to higher customer satisfaction and more efficient use of your time and resources.
Booking Limit Manager
The Booking Limit Manager feature in the Mysched system allows you to control the frequency and number of appointments that a single customer can book within a specified timeframe. This is especially useful for businesses that want to prevent customers from overbooking or monopolizing available timeslots. By setting limits, you can ensure fair access to your services and manage your schedule more effectively.
To make sure that the “Customer appointment limit” feature functions correctly, you need to ensure that the email field is marked as a required field in your booking configuration. This is crucial because the system identifies customers primarily through their email addresses. Without a required email field, the system cannot accurately track and enforce appointment limits. You can configure this setting by navigating to:
Settings > Front-end panels > Booking steps > Information
Key Components of the Booking Limit Manager
-
Customer Appointment Limit:
This feature allows you to set a restriction on the number of appointments a customer can book within a specified duration. For example, if you want to limit a customer to only 2 appointments per month, this feature helps you enforce that rule automatically. -
Allowed Capacity:
This setting determines the maximum number of appointments that a single customer can make within the defined duration. For instance, if you set the allowed capacity to 3, the customer can only book up to 3 appointments within the specified time frame. This cap is crucial for managing customer bookings and preventing any one customer from monopolizing your availability. -
Duration:
The duration defines the length of time over which the appointment limit applies. You can choose a duration such as 1 week, 1 month, or even 1 year, depending on your business needs. For example, if you choose a duration of 1 month, the customer’s booking limit will reset every month, allowing them to book a new set of appointments once the new month begins. -
Interval:
The interval is the unit of time used to measure the duration. You can select from various options, including days, weeks, or months. For instance, if you choose a 2-week interval, the system will calculate the booking limit based on a 2-week cycle. This is useful if you want to manage bookings over short, repetitive time frames.
Example Use Case
Let's say you run a fitness studio that offers personal training sessions. You want to allow your customers to book no more than 4 sessions per month. Here’s how you would set this up:
- Allowed Capacity: Set to 4.
- Duration: Set to 1 month.
- Interval: Set to months.
In this configuration, each customer can book up to 4 training sessions every month. Once they reach this limit, they won’t be able to book additional sessions until the next month starts. This setup helps you manage your trainers’ availability and ensures that all customers have fair access to appointments.
By implementing the Booking Limit Manager, you can streamline your scheduling process, maintain a balanced customer experience, and avoid overbooking issues.